
Color Code Nissan Radio Wiring Diagram
A Nissan radio wiring diagram employs a visual representation with color codes to depict the intricate wiring connections within a Nissan vehicle’s audio system. These color codes, consistent across most Nissan models, denote wires for power, ground, speaker outputs, and other critical connections within the wiring harness. This standardized color code is valuable for radio system installation and troubleshooting.
Moreover, this color-coded car stereo wiring diagram proves exceptionally beneficial when integrating aftermarket audio equipment. It streamlines the process for car owners and technicians, enabling swift identification and resolution of system issues.
The typical Nissan wiring diagram assigns a colour code to each wire and its specific function, such as power supply, ground, and speaker connections.
This approach particularly aids those installing a new radio or resolving issues with an existing Nissan stereo wiring harness, guaranteeing correct and safe wiring. This discussion will explore the intricacies of the Nissan radio color code wiring diagram, shedding light on each wire’s distinct function.”
Nissan Radio Wire Color Codes
Creating a colour-coded wiring diagram for a Nissan radio involves a bit of knowledge about electrical wiring and the specific model of the Nissan vehicle. However, there’s a general example of what a colour-coded wiring diagram for a Nissan radio might look like:
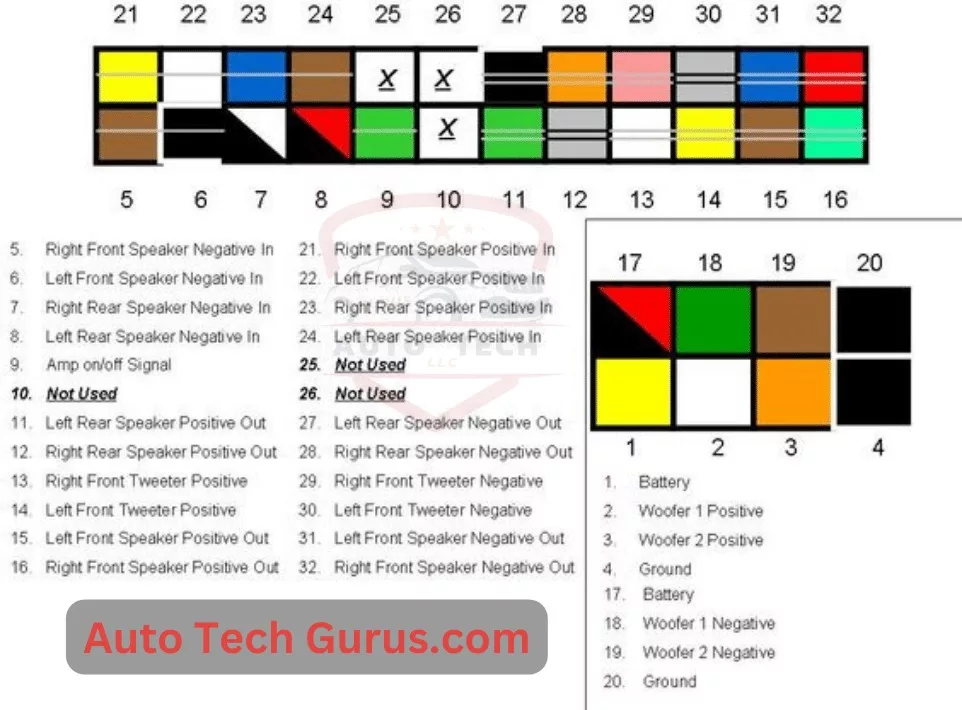
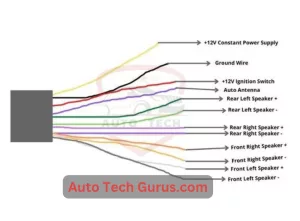
Radio Harness Connector:
| Wire Color | Function |
| Yellow | +12V Constant Power |
| Red | +12V Switched Power |
| Black | Ground |
| Blue | Power Antenna |
| Orange | Illumination |
| White | Left Front Speaker (+) |
| White/Black | Left Front Speaker (-) |
| Gray | Right Front Speaker (+) |
| Gray/Black | Right Front Speaker (-) |
| Green | Left Rear Speaker (+) |
| Green/Black | Left Rear Speaker (-) |
| Purple | Right Rear Speaker (+) |
| Purple/Black |
Right Rear Speaker (-) |
Please note that the wire colours and functions can vary depending on the Nissan model and the specific radio model. It’s crucial to consult the wiring diagram specific to your vehicle and radio model to ensure accurate connections. Additionally, always use appropriate safety precautions when working with electrical systems in vehicles.
The Nissan wiring diagram colour codes are as follows:
Factory Amplified System:
-
- The wire colour codes differ slightly if your Nissan has a factory-amplified sound system. For instance, the blue wire may connect the rear speakers instead of the remote power on/off.
Premium Sound System:
-
- Some Nissan models feature a premium sound system with additional wires and different color codes. For instance, the green wire may be used for the front left speaker and the purple wire for the front right speaker.
Aftermarket stereo installation:
-
- Remember that the wire colour codes may not adhere to the factory standard when installing an aftermarket stereo in your Nissan. To ensure correct connections, refer to the wiring diagram provided with the aftermarket stereo or consult a professional installer.
Nissan Versa:
-
- The Nissan Versa, in particular, may exhibit different wire colour codes across various years and trims. For example, 2012–2013 models may employ a brown wire for the parking brake, whereas 2014–2016 models may use a green wire for the same function, highlighting the variance between them.
- The Nissan Versa, in particular, may exhibit different wire colour codes across various years and trims. For example, 2012–2013 models may employ a brown wire for the parking brake, whereas 2014–2016 models may use a green wire for the same function, highlighting the variance between them.
Colour Code: Nissan Radio Wiring Diagram Explanation
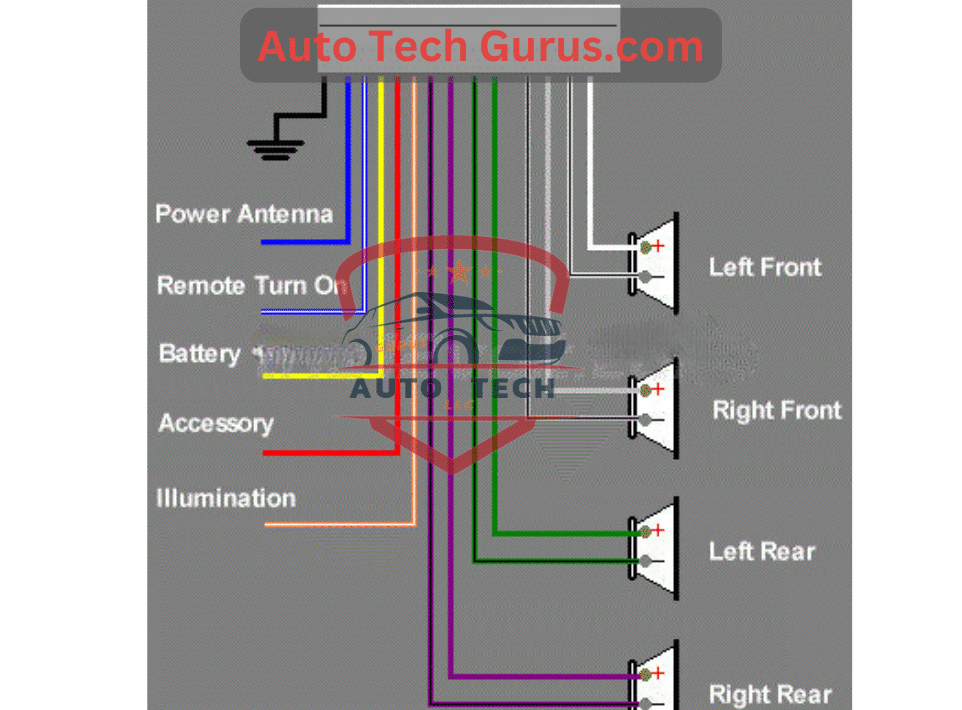
In Nissan radio installations, understanding the colour-coded wiring is essential for seamless setup and troubleshooting. Let’s break down the key wire categories:
Power and Ground Wires:
- Power wires are red, connecting to a 12-volt battery or alternator, ensuring the radio’s continuous operation.
- Connecting this to the radio’s constant power wire, not the switched power wire, is vital.
- Ground wires are black, completing the electrical circuit and connecting to the radio’s ground wire.
Speaker Wires:
- Speaker wires come in green, grey, or purple, linking the radio to the vehicle’s speakers.
- Precisely matching speaker wires to the corresponding speaker output wires is crucial for proper audio performance.
Antenna Wire:
- The antenna wire, typically blue or white, connects the radio to the vehicle’s antenna for optimal radio signal reception.
- This blue wire should be connected to the radio’s antenna input wire.
Ignition and Accessory Wires:
- These wires, colored yellow or orange, provide power to the radio when the ignition is turned on or when the accessory mode is selected.
Illumination Wire:
- This wire, Found in brown or pink, powers the radio’s backlight, ensuring controls are visible in low-light conditions.
Steering Wheel Control Wires:
- Wires in white or blue connect the radio unit to the vehicle’s steering wheel controls, facilitating convenient radio operation while driving.
Reverse Trigger Wire:
- Typically coloured purple, this wire links the radio to the reverse gear, enabling specific features or settings to activate when the vehicle is in reverse.
Understanding this Nissan radio colour code diagram is indispensable for a successful radio installation in a Nissan vehicle. By discerning the function of each coloured wire, both technicians and car enthusiasts can ensure a smooth and problem-free setup.
Nissan Radio Wiring Replacement: 4-Step Procedure
Proper wiring is essential for a successful installation when replacing the radio in a Nissan vehicle. Here’s a step-by-step guide on how to replace the radio and wiring in your Nissan:
Step 1: Remove the Old Radio Begin by removing the old radio unit. You can gently use a panel tool or a flathead screwdriver to detach the trim pieces around the radio. These trim pieces are typically held in place by clips and are situated along the radio’s edges. Once you’ve removed these trim pieces, the old radio should be exposed.
Step 2: Disconnect the wiring. Before installing the new radio, disconnect the wiring from the old unit. Locate the wiring connector that links the radio to the car’s electrical system. Several connectors on this harness will plug into the radio’s rear. Gently unhook these connectors from the radio’s rear.
Must Read Problems After Tie Rod Replacement and Solutions
Step 3: Connect the New Radio With the old radio removed and the wiring disconnected, you’re ready to install the new unit. Begin by attaching the wiring harness to the back of the new radio. Ensure the wiring is securely connected and the connectors are properly fitted. Slide the new radio into the dash and secure it in place using the screws that were removed during the initial dismantling. To complete the installation, reattach the trim pieces around the edges of the unit.
Step 4: Test the New Radio Before moving forward, it’s crucial to test the new radio to verify its proper functionality. Turn on your Nissan’s ignition and test the radio. Ensure that sound is coming through the speakers and that all the buttons and knobs on the new unit are functioning as intended.
By following these steps, you can confidently replace the radio in your Nissan, ensuring it works seamlessly with the correct wiring.
Conclusion:
In summary, the color-coded wiring diagram for Nissan radios simplifies installation and troubleshooting processes for both technicians and car owners. It provides a standardized approach to identifying crucial connections within the vehicle’s audio system, ensuring correct and safe wiring practices. While variations exist depending on factors like factory systems and specific models, following the provided wire colour codes and procedures guarantees a smooth radio replacement process. Ultimately, understanding these wire functions empowers individuals to confidently handle radio installations in Nissan vehicles, enhancing overall audio system performance.
FAQ’s
Q1: What color is the wire for the radio in the Nissan car?
A1: The wire color for the radio in a Nissan car is typically yellow or blue with a white stripe. However, it’s essential to consult the vehicle’s wiring diagram or owner’s manual for precise information.
Q2: What color is the remote wire on a factory radio?
A2: The remote wire on a factory radio is commonly blue or blue with a white stripe.
Q3: What is ACC wire on the radio?
A3: The ACC wire on a radio refers to the wire used to connect the radio to the vehicle’s electrical system.
Q4: Which wire is memory on a radio?
A4: The memory wire is typically the constant 12V wire, often colored yellow in most aftermarket head units. It maintains settings and presets when the car is turned off.
Q5: What color wire is powered by the car stereo?
A5: A car stereo usually has three power wires: the orange wire with white stripes is for dimming or lights, the red wire is for accessories, and the yellow wire delivers a steady 12V.
Q6: What is the Key 1 wire on the radio?
A6: In cars equipped with steering wheel controls, the Key 1, Key 2, and Key GND wires are commonly used for connecting to car radios.
Q7: Where do you connect the yellow wire on a car stereo?
A7: The yellow wire on a car stereo is typically connected to the power source, such as the battery or ignition switch. This wire provides power to the unit, enabling it to turn on and function correctly.
Q8: Which wire is positive in a car stereo?
A8: The positive wire in a car stereo is typically red. Red wires often represent positive voltage, while black wires represent negative voltage. However, it’s essential to check the specific manual for your car as this can vary.